Mount Gox has failed, Vircurex is failing. Bitcoin is distributed, so what's the problem?
I am a firm believer in Bitcoin. I didn't mine the fraction of a Bitcoin that I own, in so much as it's possible to own a number, or cyptographic keys, in this case. I bought it with Australian dollars though Mt Gox. I didn't trust Mt Gox to hold the currency on my behalf, so I transferred it to a Bitcoin wallet as soon as I was able.
I bought the Bitcoin at an interesting time. It had just started to gain some traction with the online tech media. The plan was to sink enough into Mt Gox to buy a single bit coin, just to say I had one. The short story was that in the days it took to transfer the money across, the currency rose in value so that I ended up with 0.39 bitcoins.
Would I do this again? Not sure, and this is where I think the problem is. Buying bitcoin as an investment is now fraught with the additional issue is that there is a lot more stolen bitcoins out there then there used to be, or coin that has been used illegally. Like banknotes with serial numbers, bitcoin transactions can be tracked, and if stolen, traced through their entire life. An added complication is that bitcoins can be combined together as well, so the question of ownership in the case of stolen coins may end up being diluted over time. Who knows how the legal eagles would interpret all of this. On the other side, I doubt whether the law would also be able to offer any protection if my bitcoin were stolen, even if the thief is identified.
So, unless you can guaranty that you've got pristinely mined coin, keeping bitcoin as an investment may be even more of a risk. There may be premium paid for these bitcoin, keeping their value up.
I probably won't buy bitcoin as an investment again.
My prediction - Bitcoins long term value will be in its transactions.
Monday, March 24, 2014


Friday, March 23, 2012
Something has gone wrong with my RepRap...

I suspect I got some foreign matter in the feed when I changed over the filament, which blocked the nozzle. Rather than have a look to see what the problem was, when the filement was slowly dribbling out, I let it run thinking (hoping) that it might clear itself. You can see the result.
Maybe it's time to order some spares.
Saturday, March 10, 2012
My Anderson Powerpole Connector crisis is over..
After forking out $5 for a single set of Anderson Powerpole Connectors from Jaycar I thought that I would bite the bullet and purchase enough from the US supplier so I wouldn't have to worry about this any more.
I purchased 100 sets from Powerwerx at $0.87 each including shipping, just in time for the Amateur Radio John Moyle Field day. (A previous post about the use for these connectors is here.)
 |
| 100 sets of 30A Anderson Connectors. |
The photo shows the connectors in groups of five, so I could easily count them.
Saturday, March 03, 2012
Reprap Huxley starts to print.
This last weekend (Saturday, 24 February 2012) my Reprap Huxley oozed it's first plastic.
This was quite an excitable moment as we have purchased the 3D printer before Christmas as a kit with promises of all the things we could create with it. Since then it has been successfully printing lots of stuff in PLA plastic and I have been able to figure out how to further tune it up and make the prints even better.
A big shout-out to the great guys an the Adelaide Hackerspace who
helped me through the final set of bugs and explained how to effectively use the printing software. (Compose.. then print.) Thanks Pix, Jonathan and Ryan.
The following are some of the items that have successfully been printed.
I need to buy some more filament.
 | ||||
| First plastic |
This was quite an excitable moment as we have purchased the 3D printer before Christmas as a kit with promises of all the things we could create with it. Since then it has been successfully printing lots of stuff in PLA plastic and I have been able to figure out how to further tune it up and make the prints even better.
A big shout-out to the great guys an the Adelaide Hackerspace who
helped me through the final set of bugs and explained how to effectively use the printing software. (Compose.. then print.) Thanks Pix, Jonathan and Ryan.
 |
| Clips for mounting the Huxley circuit board. |
 |
| Yes, it needs to print parts for itself before it was finished. |
- Huxley Circuit Board Clips.
- Shot glass as is the Reprap custom. (Its not completely waterproof, but just enough to server its purpose.)
- Toy Dump Truck
- Small box
- Yellow Tea Cup Dragon Puppet
- Case for the Raspberry Pi
 |
| Small Pink box, 40 x 40 m |
 | |||
| Yellow Dragon. |
Wednesday, February 22, 2012
RIAus 3D Printing Seminar
Twitter: #3DPrintADL
Pictures can be found here: ANAT Blog Photos, Hackerspace Adelaide
On Monday (20 Jan 2012) I attended a 3D printing and rapid prototyping seminar at the RIAus, organised by the South Australian Education Department (DFEEST). I came along as an attendee and also as a member of the Adelaide Hackerspace. There were three of us from Hackerspace each with our Huxley Reprap machines. There was also a collection of other machines on display with the University of South Australia bringing five Makerbots, lit up in various colours and another commercial supplier.
The morning program of speakers was excellent and the organisers did very well covering the broad range of issues that this technology evokes. The panel and the more practical afternoon session, built further on these ideas. In no particular order:
Pictures can be found here: ANAT Blog Photos, Hackerspace Adelaide
On Monday (20 Jan 2012) I attended a 3D printing and rapid prototyping seminar at the RIAus, organised by the South Australian Education Department (DFEEST). I came along as an attendee and also as a member of the Adelaide Hackerspace. There were three of us from Hackerspace each with our Huxley Reprap machines. There was also a collection of other machines on display with the University of South Australia bringing five Makerbots, lit up in various colours and another commercial supplier.
The morning program of speakers was excellent and the organisers did very well covering the broad range of issues that this technology evokes. The panel and the more practical afternoon session, built further on these ideas. In no particular order:
- Copyright, patents and intellectual property were mentioned a coupled of times, but other than emphasising that they are important and that the current legal framework fast enough, there really wasn't any consensus about how this area should be approached.
- The problem of atoms. How are ideas and designs turned into useful objects. We heard from a couple of companies which are providing 3D prototyping as as service (Ponoko) and as part of their business process (Monkey Stack).
- Design vs. Evolution. How will consumer items be created in the future? Will we still need designers or will the tools be so easy to use that anyone will be able to design and produce the items that they need? or will designers produce base/reference designs which individuals can then evolve to their own requirements?
- Capturing the Innovation. It is recognised that much of the technical innovation that occurs doesn't take place in large corporate research and development groups. Industry wants access to innovations and they are going to need to look out into the wider community to do that. This is something that Intel are focused on via Intel Labs. In Australia we know we are an inventive lot, but we need to somehow throw the net wider then just the establishment of the Univerisities, Schools and Industry and include things like 'Mens Sheds', 'Community and Church Groups', and 'Intense Hobbies' (eg model train builders) etc. This was emphasised by Mark Thomson, Research Director for the Institute of Backyard Studies.
Friday, February 10, 2012
Part 5: Other Amateur Radio logging software, vkcl
This is probably a good time to have a look at some of the other Amateur Radio logging software that is around.The plan was to have made some modifications to xlog, so that it could be used the
John Moyle Field Day (in 2011). Unfortunately this won't be the case, so I'll be using
vkcl. This has the added advantage of getting some experience with other logging software, and seeing what features are particular useful.
vkcl is MS Windows based software and is available as a free download from the authors website. It is regularly updated with additional code as the rules for the Australian Amature Radio contests change over time. The author has also included some international contests, as he wants to use the same software with the contests that he is involved in.
One of good thing about vkcl is that the help (via Windows Help File) is complete and the software has features which make it a real pleasure to use during contests.
vkcl is MS Windows based software and is available as a free download from the authors website. It is regularly updated with additional code as the rules for the Australian Amature Radio contests change over time. The author has also included some international contests, as he wants to use the same software with the contests that he is involved in.
One of good thing about vkcl is that the help (via Windows Help File) is complete and the software has features which make it a real pleasure to use during contests.
Tuesday, January 31, 2012
Box for Huxley Reprap
I have been building a couple of Huxley Repraps, one for myself and assisting in building one for the Adelaide HackerSpace.
In order to be able to design things to print I am going to have to get my head around using CAD. FreeCAD looks like it will do most of the things that I need a CAD program to do, so I have spent a some time learning how to use it by drawing up a box that could be used to store, carry and display the finished Husleys.

It is a 32cm cube, to be made out of 9mm MDF, with rebated joints (glue and screw).
The Huxley will be bolted to the base with the box fitting over the top, similar to a sewing machine case. A method for keeping the base attached to the box has yet to be sorted out, although a sash-clamp/tie-down appears to be the easiest solution.
The inside dimensions are 302x302x302 where the Huxley (according to my measurements) is 295mm high. (So everything should fit... but I need to measure the other dimensions and adjust accordingly... 320mm was a nice initial number to work with.)
I haven't figured out a way to make the circular cuts with the CAD program, so the handle slots are all square.
In order to be able to design things to print I am going to have to get my head around using CAD. FreeCAD looks like it will do most of the things that I need a CAD program to do, so I have spent a some time learning how to use it by drawing up a box that could be used to store, carry and display the finished Husleys.

It is a 32cm cube, to be made out of 9mm MDF, with rebated joints (glue and screw).
The Huxley will be bolted to the base with the box fitting over the top, similar to a sewing machine case. A method for keeping the base attached to the box has yet to be sorted out, although a sash-clamp/tie-down appears to be the easiest solution.
The inside dimensions are 302x302x302 where the Huxley (according to my measurements) is 295mm high. (So everything should fit... but I need to measure the other dimensions and adjust accordingly... 320mm was a nice initial number to work with.)
I haven't figured out a way to make the circular cuts with the CAD program, so the handle slots are all square.
Friday, October 29, 2010
Powering the OLPC XO-1
Another device that I thought would be worth trying out with the generator is the laptop from the One Person Per Laptop project, the XO-1.
I have been fortunate and have acquired two of these XO-1's (sparky and sparks). Both of them were pre-release versions and have been superseded in various ways, but they still attach attention when brought out on display. Kid's just love them.

Both XO's were able to be run via the inverter from their charge packs. (One of them has an issue with it's battery taking a charge, which is why it is off in the photo.)
When I get some more Anderson connectors I'll look at how they go when connected directly to the 12v-14v supply.
Tuesday, October 26, 2010
First Power Generation Application
I didn't have any luck finding my 240V inverter, but I was able to borrow one from a friend (in exchange for fitting it with an Anderson Powerpole connector.)
So, you have a peddle powered generator.. what's the first application or device that can be tested with his new power source? Being Australian and and an Amateur Radio operator, the first device had to be a radio. (For overseas readers, Australia has a proud history of peddle powered radios, which together with the Flying Doctor service, brought emergency healthcare to the centre of Australia.)
The second application was therefor a peddle powered television.

The small television did not have a rating listed on it anywhere, but after peddling for 30 minues or so, while catching up on the evening news, I would say that it is about 25 or 30W. It is uncertain what the efficiency of the inverter is at this stage.
I see this setup quickly becoming a core part of my exercise program.
Anderson Powerpole Connectors
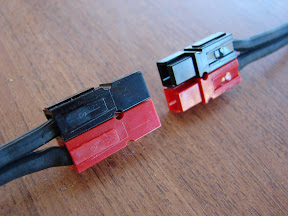
With my increasing number of 12V appliances, thoughts quickly turned to what would be an appropriate standard power connector. In the past, these appliances have had a huge range of different sized cylindrical or barrel plugs with different polarities, typically powered by a 240V plug pack.
One DC power connector which has gained some prominence is the 'Powerpole' or 'Anderson' connectors. These connectors have been chosen as the standard DC power connector for Amateur Radio operations, particularly where emergency and disaster relief operations are in mind. (eg. by WICEN)
These connectors have a couple of unique features. The most obvious is their shape.The 'plug' and 'socket' ends are identical (and symmetric) and can be used as either end of a connection. The blade contacts themselves are self cleaning, in that the motion of connection and disconnection allows the terminals to scrape any foreign material from the electrical connection area.
For those mathematically astute people, the connectors are symmetric under a rotation group. (Look out for further discussion of this in another blog post.)
The connectors come in several different ratings, but for the most common sizes for which I'm interested (15amp, 30amp and 45amp), they share the same plug enclosure, but take different sizes/gauge of wire.
There was some research required to relate the US wire specification (maximum current and gauge) with the Australian ratings (maximum current and cable cross section.) Bunnings sells cable for outdoor lighting, which had a cross section of 3.3mm^2, which corresponds to 12 gauge wire, the size that is rated for 30amps. This cable is twin core and all black, not the pretty red and black 'zip cord' that is available from the Anderson Connector distributor, but I can't see any reason why it wouldn't work.
For more information on Anderson Connections see the Powerwerx website (a distributor).
Friday, October 22, 2010
Pedal-Power Update
A very useful site is for Bosch, which produces after market replacement parts. The PDF downloads from this page have all the technical specifications for each vehicle engine type.
The budget
Someone has asked about what the budget was... I have spent maybe $250 up to this point, but now knowing what I need it would be a little less. Some things could be purchased on e-Bay etc.
- Bicycle trainer $115 on ebay (mine was new) (eg. http://shop.ebay.com.au/?_nkw=bicycle+trainer) Remove and throw away resistance roller.
- Alternator $55. From City Dismantlers, Gepps Cross (Toyota Section) Connecting plug - free - worth asking for it when you get the alternator, as mine was stripped from the wiring of a wreck.
- Old wooden shelving $??. It's what I had lying around.
- Assorted Hardware: screws, bolts, toggle maybe $60. I used stainless steel toggle for tensioning, and Stainless U-bolts to clamp the trainer to the board. (Not the cheapest solution, but reusable parts.)
- Aluminum L section (cut and drilled to suit) $6 Purchased from Bunnings in 1.6m lendth.
- 12V Battery (required) $28 from Jaycar 12V 6AH Sealed Lead Acid. No reason for this specification other than this is what I had around.
- Switches with 'missle cover' $12. Always wanted on of these I want to install add a couple more.. a second one to switch the 'load' on... alternator has some trouble starting to generate if another load is pulling from the battery, and on to isolate the battery.
- Spade and Blade Crimp connectors $2.75 (per pack of 8) Various sizes. Still need to find proper size for battery terminal connection to alternator.
- Cables $?? Scavenged from various bits and pieces. Plan to use regular extension cable (from Bunnings) to extend 'Ignition' and 'Load' switch so that they are accessible from the handlebars while on the bike. (I might have to rethink this as these are rated for 10A AC, and some of the applications that I am looking at use 30A rated wire.
- Anderson Connectors $5 pair from Jaycar. I would like to replace the spade and banana plug connectors that are currently being used, with Anderson 30A connectors where ever possible. (This will be the subject of another blog post with links.)
I have also bought a couple of boxes from Jaycar to mount these swithes, as well as two LED's (and resistor) that replaces the usual 'charge lamp'.
Other considerations/thoughts/things to try..
I have tried making a radio call from the bike, powering my Handheld radio. There was sufficient noise on the supply to be heard on the output, while both receiving and (as reported) transmitting. Some work needs to be done to remove this (Large Capacitor + something else.. got some Amateur Radio friends on the case).
I have a small 240V inverter around somewhere. If I find it, I'll see if it is possible to run a small TV directly while peddling.
A summary, of sorts.
Nothing in this project has really been engineered so I would like at some stage to take a bunch of measurements and do some calculations on the systems efficency etc.
For example, I would love to get a 'current clamp' and get some measurements of the running generator under different loads.
The alternator has a build in voltage regulator, which works by modifying the current in the rotor windings. This means that the choice of peddling rate doesn't particularly matter (voltage remains the same) and the gearing is sufficient to spin up the alternator to fairly high RPM's if required (calculation required).
Thanks everyone for your interest.
Monday, October 04, 2010
Building a Pedel Powered Electric Generator
Greetings.. over the last couple of months, thoughts and materials have been gathering in order to build a pedal powered electric power supply, which could be used, amongst other things to recharge batteries and to power an amateur radio transceiver.
I am pleased to announce that the first stage of construction, getting an vehicle alternator to reliable produce power, has been achieved.
Pedel Powered Alternator - Stage 1
 |
| From pedal-power |
I've put some pictures up on the web here.. http://picasaweb.google.com/pschulz01/PedelPower
Stage 1 involved getting the alternator mounted properly and the generate a stable output voltage.. which it did at 14.7V. All that it is currently doing is recharging the battery.
What has been constructed?
Step 1 - The alternator and wiring harness.
An alternator from a local used car parts dealer was purchased. I picked up a Toyota alternator for $55 at Gepps Cross wreckers. I started to build up the wiring harness.. it wasn't really possible to test anything properly as (apparently) the alternator only starts to kick in at around 800-1000 RPM. Some quick calculations indicated that that the racing bike would be able to do provide this (with a direct friction drive with the wheel) at reasonably low speed (6km/h - simulated, it's on a trainer.) It may be necessary to even further reduce the ratio by fitting a larger wheel to the alternator. This would also help with the traction if it was something like a go-cart or small sack truck wheel.
When obtaining the alternator, it is definitely worth asking for the connecting plug at the same time. Mine was stripped from a wreck at the wreckers, and supplied for no cost, which was quite handy. (I did have to go back the day after to ask about getting it though.)
 |
| From pedal-power |
 |
| From pedal-power |
Step 2 - Mounting.
The mounting for the alternator was the biggest concern. It needed to be sturdy enough to hold the alternators weight and allow it to be held against the bikes tire and be rigid so that there weren't issues with vibrations as the alternator and the bike wheel were spun up.
A mount made out of welded steel would have been possible, but an old pine board was also handy and fitted the bill quite well. A length was cut to go under the rear struts of the bicycle trainer, and the couple strips of wood were added for feet. The trainer was bolted down to this with a couple of 50mm stainless steel u-bolts.
A stand for the alternator was built from couple of pieces of pine board, length ways. The alternator was mounted by drilling a hole through the boards for a bolt, which allowed the alternator to pivot against the rear wheel of the bike. These boards are held in place by two full length brackets made from aluminium L sections, cut and drilled to suit.
 |
| From pedal-power |
The final piece of the mounting is an eye-bolt through the other mounting hole on the alternator and a toggle connected to the base of the bicycle trainer stand (where a suitable hole had already been placed), which held the alternator against the tire.
 |
| From pedal-power |
Step 3 - Assembly and Testing
Everything was assembled and a couple of trial hand cranks were done to run the alternator up. Everything ran smoothly without the alternator energised to produce power.
With the ignition switch on, but with the alternator just resting against the bike tire, the surfaces would slip as the alternator started producing power. This was solved by adjusting the tension in the toggle bolt holding the alternator against the tire.
 |
| From pedal-power |
While peddling, the alternator produces 14.7-14.8V, and can be used to charge the battery that is currently attached.
What next?
The next step is to see what the system is like generating power for various loads.. and then use it to produce power for real world applications.
I plan to have it on display at the upcoming "Wireless Institute of Australia" National Field Day (aka. national publicity day)on the 23rd of October outside of the Bunnings at Parafield airport.
Update: The local "WIA National Field Day" event ended up being held in the Salisbury Town Centre and the generator was successfully demonstrated to work well.
Friday, March 12, 2010
Part 3a: xlog - Preparing to hack, the aftermath.
The previously published parts of this series can be found here:
- Part 1: Logging Software for Amateur Radio contacts - xlog
- Part 2: Hacking on xlog
- Part 3: Preparing to hack
- Appendix: References/links
Some build issues...
After completing a build, it would be nice if we could return the code the state we started from. This is actually more than a 'nice to have' as it is a useful indicator of completeness. For example, if a particular compiled file isn't removed in a 'make clean', then maybe the associated source code hasn't been added to the source repository. There is not necessarily any logic in this, except that something is wrong, needs to be looked at and fixed.
I think of this as being a zero'th order test for any software that I compile from source, and git makes this issue very easy to describe and characterise.
With regards to 'xlog', after a build and a 'make clean', the 'git status' command reveils the following (where I've reformatted the output just a little.)
Changed but not updated:
  deleted:    po/xlog.pot
and
  modified:   CVS/Entries
  modified:   data/doc/CVS/Entries
  modified:   po/CVS/Entries
  modified:   src/CVS/Entries
and
Untracked files:
  AUTHORS
  CVSROOT/
  ChangeLog
  Makefile.in
  autom4te.cache/
  configure
  data/Makefile.in
  data/desktop/Makefile.in
  data/doc/Makefile.in
  data/dxcc/Makefile.in
  data/glabels/Makefile.in
  data/man/Makefile.in
  data/maps/3D2/Makefile.in
  data/maps/3Y/Makefile.in
  data/maps/E5/Makefile.in
  data/maps/FK/Makefile.in
  data/maps/FO/Makefile.in
  data/maps/FR/Makefile.in
  data/maps/HK0/Makefile.in
  data/maps/JD/Makefile.in
  data/maps/KH8/Makefile.in
  data/maps/Makefile.in
  data/maps/SV/Makefile.in
  data/maps/VP6/Makefile.in
  data/maps/VP8/Makefile.in
  data/mime/Makefile.in
  data/pixmaps/Makefile.in
  data/remote/Makefile.in
  data/utils/Makefile.in
  src/Makefile.in
  src/logfile/Makefile.in
The first issue is with po/xlog.pot, which has mysteriously disappeared. It can be restored with the following.
$ git checkout -- po/xlog.potI have seen glib errors when trying to run the application and haven't got to the bottom of this yet. I don't see the error occur if I make sure that the above file is present, but I haven't been able to reliably replicate to problem.
The '''CVS/Entries''' files can be committed to the git repository, but looking at the actual differences shows that this is only due to timestamp changes from upstream. It would probably be safe enough to ignore these files, and git has a file that allows these this to be set. (An exercise for the reader. Have a look at the man page for git.)
$ git diff CVS/Entries
diff --git a/CVS/Entries b/CVS/Entries
index 30be513..42e4863 100644
--- a/CVS/Entries
+++ b/CVS/Entries
@@ -36,4 +36,4 @@ D/xlog////
 /missing/1.3/Wed Jan 14 11:45:11 2009//
 /mkinstalldirs/1.3/Wed Jan 14 11:45:11 2009//
 /xlog-2.0.lsm/1.1/Tue Feb 10 09:33:11 2009//
-/aclocal.m4/1.8/Thu Mar 11 11:55:55 2010//
+/aclocal.m4/1.8/Thu Mar 11 12:54:52 2010//
Finally, other than '''AUTHORS''' and '''ChangeLog''' (which are symbolic links as specified in README.cvs) all of the other files have come into existence in the build process and should be able to be safely removed, as they didn't exist in the original source.
$ rm -rf autom4te.cache
$ rm configure
$ find . -name Makefile.in | xargs -n 1 rm
This leaves use with the following, which is where we want to be:
$ git status # On branch master # Untracked files: # (use "git add..." to include in what will be committed) # # AUTHORS # ChangeLog nothing added to commit but untracked files present (use "git add" to track)
A git repository with the code that I will be working on in the next blog posts has been setup here: http://git.mawsonlakes.org/cgi-bin/gitweb.cgi?p=paul/xlog.
Monday, March 08, 2010
Appendix: References (links etc.) for xlog hacking.
Useful Webpages
xlog
- Software Website - http://freshmeat.net/projects/xlog
- CVS Download Page - http://savannah.nongnu.org/cvs/?group=xlog
- Browse CVS Source- http://cvs.savannah.gnu.org/viewvc/xlog/xlog
git
git - The Fast Version Control System- Software website - http://git-scm.com
- Wikipedia - http://en.wikipedia.org/wiki/Git_(software)
epkg
epkg is an encap package manager.- Software Website - http://www.encap.org/epkg
Software Repository
I'll be updating my code changes to xlog here.- Repository Browser - http://git.mawsonlakes.org/cgi-bin/gitweb.cgi?p=paul/xlog
- GIT Clone URL - http://git.mawsonlakes.org/paul/xlog
Part 3: xlog - Preparing to hack
The previously published parts of this series can be found here:
- Part 1: Logging Software for Amateur Radio contacts - xlog
- Part 2: Hacking on xlog
- Appendix: References/links
cvs -z3 -d:pserver:anonymous@cvs.savannah.nongnu.org:/sources/xlog co xlogEven before configuring, the first thing I do is put the whole thing into a Git repository. The main reason for doing this upfront is that it then becomes possible to see what files are created or altered during the software building process. When we get around to making changes we can then make use of branches and commits.
  cd xlog
  git init-db
  git add .
  git commit -m 'Initial commit'
Use 'git status' to see which files are different.
Lets now build the software, as per README.cvs.
  ln -s ...
  autoconf
  automake
  ./configure
  make
  make install
Now, 'make install' will fail unless you give yourself system (root) privileges as it will try to install the code into the system directories (eg. /usr/bin, /usr/lib etc.). For the developer, there are several methods to get around this requirement. I use a tool called 'epkg', which allows software to be installed
To update the repository from upstream:
  (commit any outstanding changes to another branch)
  git checkout master
  cvs update
These changes can then be pulled into a local working branch by using:
  git checkout (your-branch)
  git rebase master
Thursday, March 04, 2010
Part 2: Hacking on xlog
In the first part on "Hacking on xlog" I eluded to the fact that xlog was good, but that I wanted to made some changes to it. The following article discusses these changes. What changes do I want to make to xlog?
- Be able to add additional rules for more contests - Currently xlog has some useful rules and checks (eg. duplicates) but they are either overly general (check for all the duplicates in a log file) or specific to a particular competition. It would be good able to support different contests rules by either an extension language or a plug-in or dynamic library architecture.
- Make the User Interface (UI) layout configurable - It would be good to be able to modify the UI to suit the way that I setup and use my set radio. Gnome and Gtk+ applications can be written using libglade, where the UI is defined in an XML file along with the functions that they call. It is then possible to rearrange the interface via the XML code, without touching any of the underlying code. Currently, xlog has 'hardcoded' all of the widgets and their positions into the code of the application itself.
- Add support for other forms of radio operation - Logging is necessary in on-air contests but there are other types of radio operation where a suitable logging application would also be very useful. Examples include: Running nets, Message Relaying and Emergency Operations.
- Multiple Operator Support - Support for multi-user access and multiple user logs. This would be useful for multiple user stations and for collating logs for competition managers.
Tuesday, February 23, 2010
Logging Software for Amateur Radio contacts - xlog
Introduction
Something that I have recently been looking into is Amateur Radio logging software available on Linux, in particular Ubuntu and Gnome. One of the things that Ham (Amateur) Radio operators like to do is make contacts with other Hams, exchange details and sometimes, even exchange physical 'QSL Cards', which are postcards giving details of the contact made (Frequency, Equipment used etc.). In general, the more and varied these contacts are the greater the enjoyment found in the hobby. In addition to the adhoc 'CQ' contacts, there are regular contests, where operators try to make contacts in a particular period of time, on particular radio bands. Logs of the contacts make are submitted to the contest manager and points are awarded based on the contest rules. Rules include such things as a point for every contact made, multipliers for contacts made in particular bands and bonus points given for particular types of contacts. The software that I have found and I am most happy with is called 'xlog', which does most of what I want. I would like to be able to get it to do more (see below) and there are a couple of things which if they were done just a little bit differently would make if even more useful and easy to customise. The software is licensed under the GPL v2, so in the words of Jeremy Clarkson - 'How hard can it be?' The plan is to put together a series of posts about my experience with working on this software. Future posts will follow something like the following outline..- What do I want to change?
- Getting the source - and using git.
- Setting up the development environment - using epkg
- Making changes.
- Getting these changes back into xlog.
Wednesday, December 16, 2009
Expect Kakapo
Its of to Linux.Conf.Au 2010 in Wellington, New Zealand. Work isn't paying for the trip this time around, so I'll be going as a hobbist. I'll miss out on the Professional Delegates Networking session, which would have been good, but there is usually plenty of left over swag to buy at the end of the week.
For those that missed the reference in the title, a Kakapo is a flightless nocturnal native New Zealand parrot.
Some of the things I want to get out of this conference:
- Peoples experiences, both good and bad, with organising a Linux User Group. There is a group of Adelaide people looking to start up one in the New Year... any advice would be most welcome.
- Thoughts, comments on how to get people talking about, using and experiencing Free and Open Source Software (see first point).
- Meeting other Linux Users who are also Ham Operators (VK5FPAW listening).
- Put together an Arduino board by hand - see the Arduino mini-conference.
Tuesday, April 14, 2009
When will Microsoft stop the FUD?
Looks like Microsoft are at it again.. apparently they now have 96% of the Netbook market, with four times the return rate from netbooks shipped with other operating systems.
(The articles are here and here.)
A rebuttal by Chris Kenyon of Canonical, along with it's coverage tries to put this into perspective, but the FUD is already out there.
Australia has enough problems getting any form of choice into our markets. (You might say that we live in a country of monopolists.) Netbooks running Linux may well be available in other parts of the world, but the market that these machines were designed for, doesn't appear on the radar of the major retailers here. Not yet anyway.. and all the people that I know who have bought really cool netbooks, which run linux, have done so because they 1) travel and 2) bought it elsewhere.
Microsoft can (and probably will) continue generating this sort of press. On the other hand, the Ubuntu community* and Canonical will continue to release an ever improving Operating System complete with application software every 6 months, like they have over the last 5 years and 10 releases.
The Ubuntu release - 9.04 - is due 23rd April.
* - includes all the contibuting Free and Open Source software developers around the world.
Friday, January 16, 2009
Expect squrrels...
Well, it's nearly time to head off to Linux.Conf.Au again, and I've gotten around to contemplating what this year may hold for Linux, and what hints may come out of the conference... but it's usually pretty unwise to ask this sort of question.
Nobody actually knows. Yes there are big companies behind Linux and the Free and Open Source Software community. Yes, they pay for a majority of the software development on core systems like the Linux kernel, the desktop environment, and server software, but there are also an awful number of people who contribute just because they can.
... and it's these people that the Linux.Conf.Au conference is actually for.
The program comittee has done an excellent job again this year. It involves a huge amount of work to go through all the various submissions, but the quality of the speakers and presentations looks as high as it has ever been.
I'm also really looking forward to the lightening talks. Unfortunately several miniconfs have put their lightening sessions on at the same time. This is maybe something for future Linux.Conf.Au organisers to look at. If it were possible, I would go and see them all. This is where the really interesting technical gems will be found, and where future conference speakers will get their initial experience.
So what will be the 'next big thing'? Come to the conference, watch this space, have a look at the video's of the presentations and make up your own mind. With Free and Open Source Software it all possible.
Personally, I expect squirrels.
Subscribe to:
Posts (Atom)